Introduction
Most web hosting providers will auto-install WordPress for you when you sign up for their hosting services. Typically, an auto-install script created by your hosting provider is used on the back-end to setup and provision your hosting account with the latest version of WordPress. Some hosts create a hook to install WordPress through a 1-click installer such as Softaculous.
Table of Contents
In most cases, WordPress is installed and configured without the www in front of your domain. Technically speaking, the prefix www. is a subdomain. When WordPress is installed without the www prefix, all references to your URL in your site’s files and database tables will be without the www. If someone navigates to your domain, they’ll reach the destination URL at yourdomain.com rather than www.yourdomain.com.
WordPress Dashboard
You can add or remove the www directly in your WordPress dashboard, by editing your wp-config.php, or accessing phpMyAdmin and editing the wp_options database table values for siteurl and home. Below you’ll find steps on how to add the www to your WordPress site’s URL using either of the three options mentioned.
General Settings
Inside of your WordPress dashboard you’ll want to navigate to the Settings > General section. This is where you can edit the WordPress Address (URL) and Site Address (URL).

Click the Save Changes button at the bottom of the page.
If your site does not have an SSL Certificate installed, DO NOT use https://. Keep the http:// before the www. Doing so will break your site.
wp-config.php
To change your WordPress site’s URL by editing your wp-config.php file, you will need to have access to your site’s files via File Manager, through cPanel or hosting control panel your host gives you access to, or by connecting to your hosting account via FTP (File Transfer Protocol) using an FTP client such as FileZilla.
Here is the code you will want to add to your wp-config.php. Replace yourdomain.com with your domain.
define('WP_HOME','http://www.yourdomain.com');
define('WP_SITEURL','http://www.yourdomain.com');
Use this code if your site has an SSL Certificate. You’ll want to have https in the home and site URL values.
define('WP_HOME','https://www.yourdomain.com');
define('WP_SITEURL','https://www.yourdomain.com');
Inside of cPanel, locate the File Manager. Clicking this icon will open a new window and take you inside of File Manager.
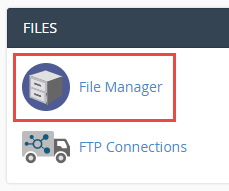
Navigate to your site’s root directory or public_html. Look for the wp-config.php file in the list of files. Once you have located the wp-config.php, right click and Edit.
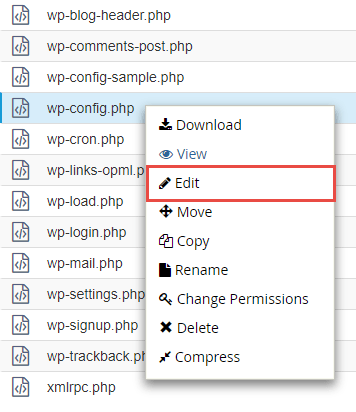
Add the two lines from earlier in this post to the wp-config.php and save changes.
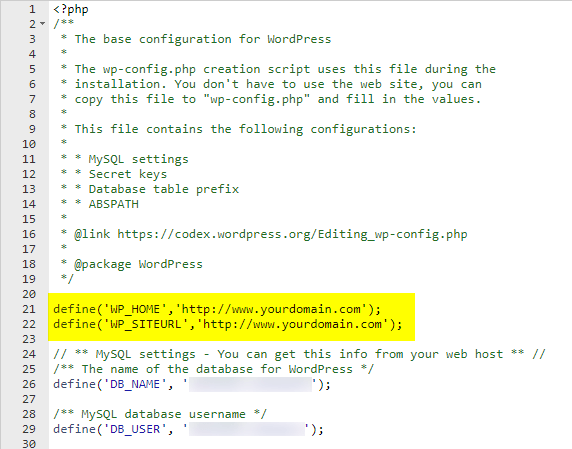
By going with this method you’re hardcoding these values into your WordPress site. If you try to navigate to the General settings page inside of your WordPress dashboard, you’ll now notice that you can’t edit the WordPress Address (URL) and Site Address (URL). Those two field boxes will be dimmed.
phpMyAdmin
It is also possible to update your WordPress Address (URL) and Site Address (URL) in the database. We’re going to assume you have access to phpMyAdmin for this option.
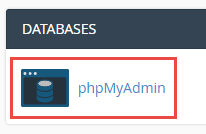
If your WordPress site is hosted on a cPanel account, you’ll want to find the phpMyAdmin icon after logging into cPanel. Clicking the phpMyAdmin icon will open a new browser window.
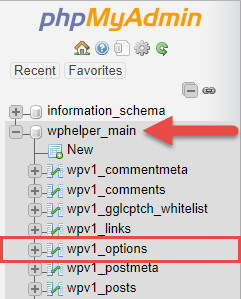
Expand your database to view the database tables and locate the wp_options table. Your wp_options table may have a slightly different prefix. In this example, it’s the wpv1_options table.
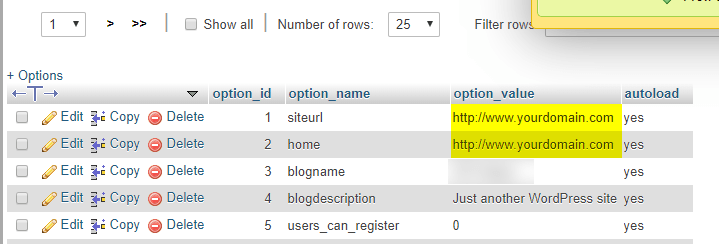
After you’ve located the wp_options table (wpv1_options in this example), look for the siteurl and home in the option_name column. To the right of those, you will update the values to your domain with the prefix www as shown below:
When you log back into your site and navigate to the General Settings page, you’ll now see these changes have taken affect.
Force www or non-www
If you decided to add the www prefix to your WordPress URL then you’ll also want to make sure to force the www version of your URL for anyone that visits your site. This prevents causing any confusion with the search engines, which view both the non-www and www versions of your site as two separate entities and may hurt your rankings due to duplicate content if you don’t force the www (or non-www).
To force the www you can add a simple rule in your .htaccess file. You will need to access cPanel or your site’s files via FTP. In this example, we’re going to log into cPanel and access the File Manager as we have done in previous steps.
Once you have navigated to your public_html folder you may not see your .htaccess. It either doesn’t exist or dot files are hidden. Dot files are files whose name begin with a (.) period.
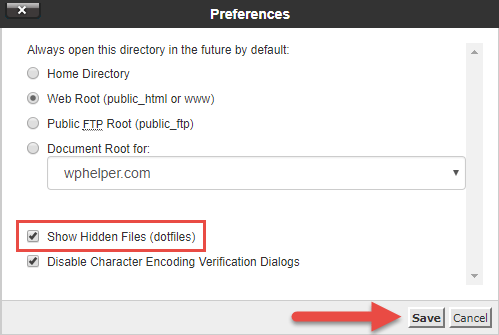
Inside of the File Manager click the Settings button in the top right.

A popup window will appear. Check the box for Show Hidden Files (dotfiles) and click the Save button.
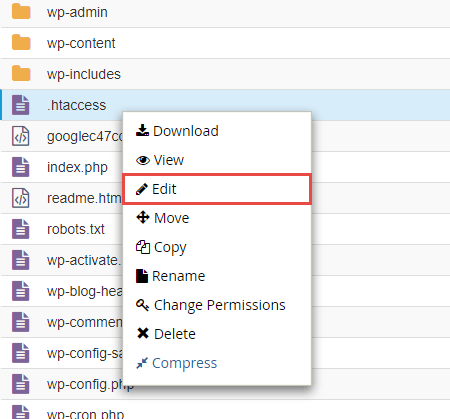
Now you’ll see the .htaccess in your public_html folder. Right click the .htaccess and click the Edit link to add the new .htaccess rule.
Add the following to the top of your .htaccess file and click the Save button:
#Force non-www to www
RewriteEngine on
RewriteCond %{HTTP_HOST} ^yourdomain.com [NC]
RewriteRule ^(.*)$ http://www.yourdomain.com/$1 [L,R=301,NC]
Your .htaccess file should look similar to the image below after you have added the new .htaccess rule to force non-www to www.
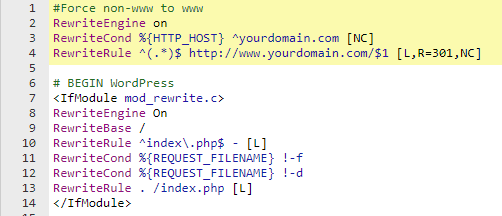
Make sure to replace your yourdomain.com with your actual domain.
For those of you looking to force the non-www version of your URL, you’ll want to use the following code in your .htaccess file:
#Force www to non-www:
RewriteEngine on
RewriteCond %{HTTP_HOST} ^www\.yourdomain\.com [NC]
RewriteRule ^(.*)$ http://yourdomain/$1 [L,R=301]
