Introduction
Google and other leading search engines have announced that they will place a higher emphasis on secure sites in their ranking algorithms. Their ranking factors, out of hundreds, will favor a secure (https) site and rank higher than a non-secure (http) counterpart. Read further to learn more about SSL Certificates and how to force https with a 301 redirect for your WordPress site by adding a rewrite rule into your .htaccess file.
Table of Contents
SSL Certificates
To secure your site from http to https you will need an SSL Certificate installed on the server that your site is hosted on. There are many types of SSL Certificates, which we won’t get into detail in this article. The majority of you reading this will be fine with what’s called a Domain Validated (DV) SSL Certificate.
Most WordPress web hosting providers will sell third-party SSL Certificates and many WordPress web hosts also support Let’s Encrypt.
Let’s Encrypt
Let’s Encrypt is a Certificate Authority that issues free SSL Certificates to your domain. A Let’s Encrypt SSL Certificate will renew automatically every 90 days. The growth of Let’s Encrypt and number of SSL Certificates issued is staggering and continues to be adopted by web hosting providers every day.
Redirect and Force HTTP to HTTPS
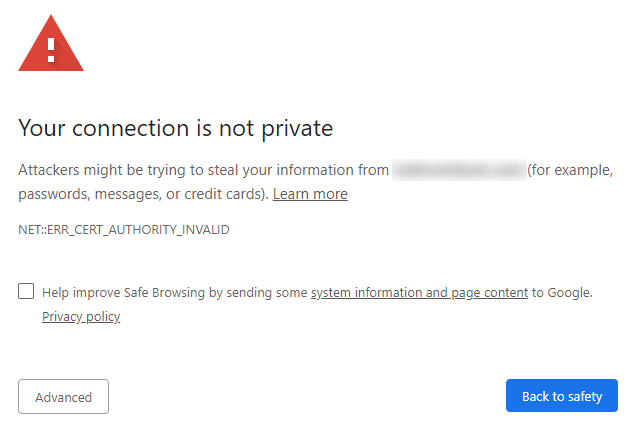
Now that you have a SSL Certificate installed for your domain, you will want to force HTTPS. When a visitor types your domain into their browser’s address bar it will automatically redirect them to https://yourdomain.com (HTTPS) rather than http://yourdomain.com (HTTP). The 301 redirect to force HTTPS is desired so the visitor trying to access your site won’t see a Your connection is not private page or insecure browser warning if they land on the non-secure version of your site.
The WordPress redirect code example below will ensure that visitors who go to your site will be redirected to the secure (HTTPS) version of your site as long as you have an SSL Certificate installed properly on the server your site is hosted on.
301 Redirect Code Example .htacess
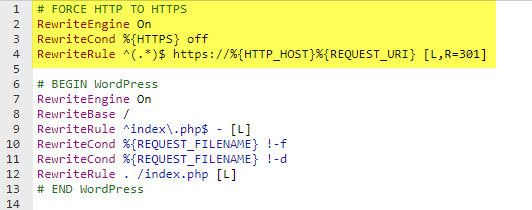
Add the following code to the top of your WordPress site’s .htaccess file.
# FORCE HTTP TO HTTPS
RewriteEngine On
RewriteCond %{HTTPS} off
RewriteRule ^(.*)$ https://%{HTTP_HOST}%{REQUEST_URI} [L,R=301]
After adding the rewrite to your WordPress site’s .htaccess, you will need to clear your browser’s cache, restart your browser, and access your site again if you aren’t being redirected to the secure version of your site.
.htacess Placement
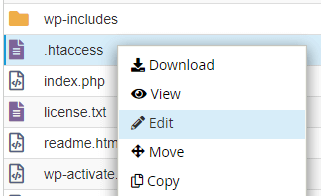
Edit the .htaccess file. The .htaccess (dotfile) can be accessed using FTP or inside of cPanel. We’ll use the File Manager inside of cPanel to edit and place the rewrite in the .htaccess as shown below.
Testing a Permanent 301 Redirect
After updating your .htaccess with the 301 redirect to force HTTP to HTTPS you’ll want to make sure that the redirect is working.
You can test the 301 redirect by typing the non-secure version of your URL in the address bar of any browser. If it redirects you to the HTTPS version of the URL then the 301 redirect to force HTTPS is working.
301 Redirect Checker
There are also handy tools such as RedirectCheck.com. If you enter the non-secure (HTTP) version of your URL into the redirect checker, you should see output from the test similar to below.
In the example below you’ll see that http://wphelper.com (HTTP) was moved permanently to http://wphelper.com (HTTPS).
Results:
http://wphelper.com

HTTP/1.1 301 Moved Permanently
Date: Wed, 26 Jun 2019 01:24:31 GMT
Content-Type: text/html; charset=iso-8859-1
Transfer-Encoding: chunked
Connection: keep-alive
Set-Cookie: __cfduid=df902247909f404af1d1784559e2912e71561512271; expires=Thu, 25-Jun-20 01:24:31 GMT; path=/; domain=.wphelper.com; HttpOnly
Location: http://wphelper.com/
Server: cloudflare
CF-RAY: 4ecb61d2fec7d0e4-SJC

http://wphelper.com/

HTTP/1.1 200 OK
Date: Wed, 26 Jun 2019 01:24:33 GMT
Content-Type: text/html; charset=UTF-8
Transfer-Encoding: chunked
Connection: keep-alive
Set-Cookie: __cfduid=d96763a3fd11c6c535f18679ac76f73081561512272; expires=Thu, 25-Jun-20 01:24:32 GMT; path=/; domain=.wphelper.com; HttpOnly
Link: ; rel="https://api.w.org/"
Expect-CT: max-age=604800, report-uri="https://report-uri.cloudflare.com/cdn-cgi/beacon/expect-ct"
Server: cloudflare
CF-RAY: 4ecb61d41f1ad0e0-SJC
Update Cloudflare Crypto (SSL) Settings
If you’re using Cloudflare please read on. For those of you who are not familiar with or using Cloudflare you do not need to follow this next step.
When your site is secure (HTTPS) and you’ve added the .htaccess rule from above you’ll need to update the Crypto settings in your Cloudflare account for your domain.
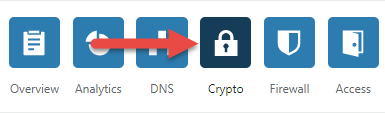
Log into Cloudflare and click the Crypto icon.
From the dropdown menu, update the Crypto SSL setting from Flexible to Full (strict).